#1 2010-02-08 00:35:51
LevelOne FNS-1000
日前hugo15兄寄來一台LevelOne FNS-1000讓我測試安裝Optware. 經他同意, 將改機步驟簡述如下:
型號: LevelOne FNS-1000
韌體: V2.7R19
CPU: XScale-IXP425 266Mhz
RAM: 32MB
CPU and memory benchmark
1. 解開封印, Telnet. 更改root密碼. (亦可由J5接console, 直接修改/etc/passwd)
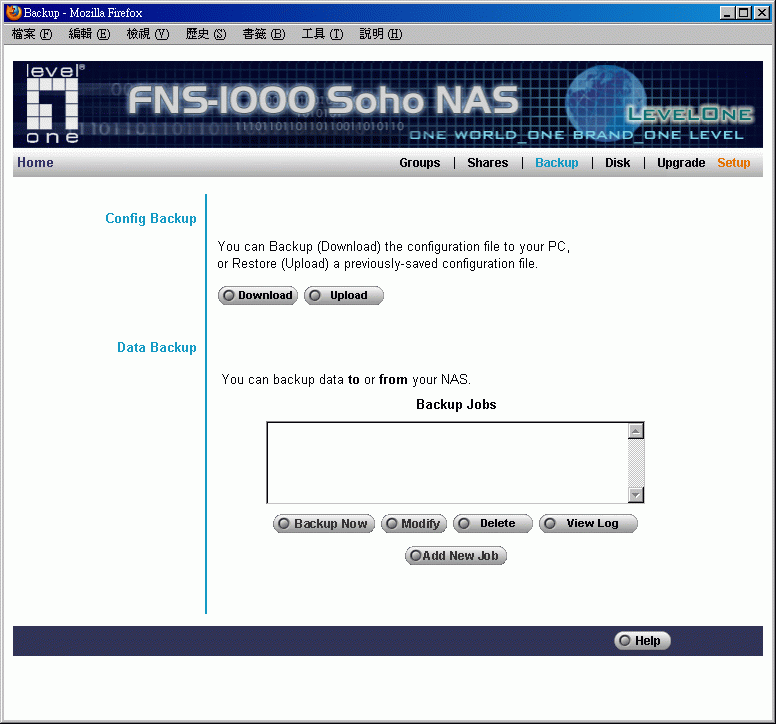
1-1) 下載設定檔
Config Backup--> Download
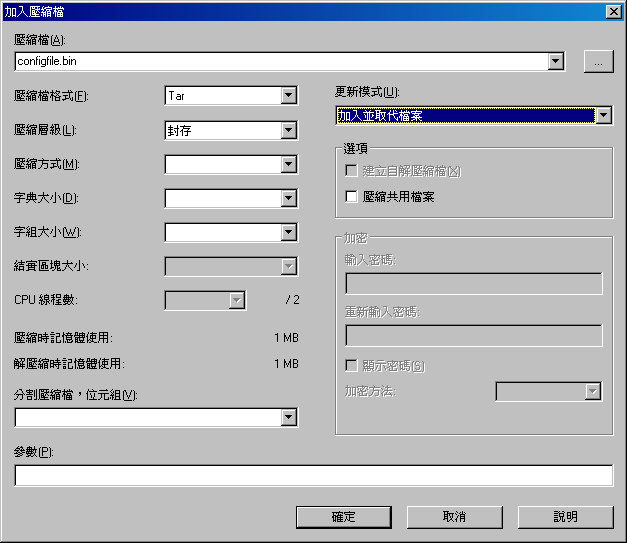
1-2) 7-Zip解開configfile.bin, 修改configfile/hd~2/conf/passwd, 將root密碼改為xqnMpE/plEnFs
root:xqnMpE/plEnFs:0:0:root:/root:/bin/sh
1-3) 7-Zip封存tar
1-4) 上傳設定檔
Config Backup--> Upload
1-5) Telnet, root, 無密碼.
FNS-1000 login: root
Password:
No directory, logging in with HOME=/


BusyBox v0.60.4 (2006.07.05-08:18+0000) Built-in shell (ash)
Enter 'help' for a list of built-in commands.

#
root無家目錄.
內建BusyBox太舊, 更換.
2. 更換BusyBox
2-1) 下載busybox-base
2-2) 7-Zip解壓縮, 經FTP上傳data.tar到ADMIN目錄
# ls -l /harddisk/hd~2/data/
-rwxrw----    1 502      501        563200 data.tar
drwxrwxr-x    2 502      501             6 public
-rw-------    1 0        0               0 quota.user
2-3) 解開data.tar
# cd /harddisk/hd~2/data/
# tar -xvf data.tar
./
./opt/
./opt/bin/
./opt/bin/busybox
# rm data.tar
2-4) 下載libm.so.6, 經FTP上傳, 安裝.
# chown root:root libm.so.6
# chmod 644 libm.so.6
# mkdir opt/lib
# mv libm.so.6 opt/lib/
2-5) 建立root家目錄
# mkdir root
2-6) 建立, 編輯系統啟動檔
# touch rc.custom
# chmod u+x rc.custom
# vi rc.custom
#!/bin/sh

ln -s /harddisk/hd~2/data/root /root
ln -s /harddisk/hd~2/data/opt /opt
mv /bin/busybox /bin/busybox.0604
/opt/bin/busybox ln -s /opt/bin/busybox /bin/
2-7) 重新開機後, Telnet
FNS-1000 login: root
Password:


BusyBox v1.10.3 (2009-11-02 16:11:17 UTC) built-in shell (ash)
Enter 'help' for a list of built-in commands.

#
3. 安裝Optware
3-1) 下載openssl, 7-Zip解壓縮, FTP上傳data.tar
# mkdir openssl
# tar -xvf ../data.tar -C openssl/
# rm ../data.tar
# cp openssl/opt/bin/openssl /opt/bin/
# cp openssl/opt/lib/libcrypto.so.0.9.7 /opt/lib/
# cp openssl/opt/lib/libssl.so.0.9.7 /opt/lib/
# cd /opt/lib/
# ln -s libssl.so.0.9.7 libssl.so.0
# ln -s libssl.so.0.9.7 libssl.so
# ln -s libcrypto.so.0.9.7 libcrypto.so.0
# ln -s libcrypto.so.0.9.7 libcrypto.so
# cd ~
3-2) 下載libidn, 7-Zip解壓縮, FTP上傳data.tar
# mkdir libidn
# tar -xvf ../data.tar -C libidn
# rm ../data.tar
# cp libidn/opt/lib/libidn.so.11.5.44 /opt/lib/
# chmod 644 /opt/lib/libidn.so.11.5.44
# cd /opt/lib/
# ln -s libidn.so.11.5.44 libidn.so
# ln -s libidn.so.11.5.44 libidn.so.11
# cd ~
3-2) 下載wget-ssl, 7-Zip解壓縮, FTP上傳data.tar
# mkdir wget-ssl
# tar -xvf ../data.tar -C wget-ssl
# rm ../data.tar
# cp wget-ssl/opt/bin/wget /opt/bin/
3-3) 下載ds101-bootstrap, 取ipkg.sh.
# mkdir bootstrap
# mv /harddisk/hd~2/data/ds101-bootstrap_1.0-4_armeb.xsh bootstrap/
# cd bootstrap
# sh ds101-bootstrap_1.0-4_armeb.xsh
DS-10x Bootstrap extracting archive... please wait
bootstrap/
bootstrap/bootstrap.ipk
bootstrap/bootstrap.sh
bootstrap/ipkg.ipk
bootstrap/ipkg.sh
bootstrap/openssl.ipk
bootstrap/wget-ssl.ipk
48899+1 records in
48899+1 records out
Creating temporary ipkg repository... success
Installing DS101(g)-bootstrap package..../ipkg.sh: line 1147: sed: not found


BusyBox v1.10.3 (2009-11-02 16:11:17 UTC) built-in shell (ash)
Enter 'help' for a list of built-in commands.

# exit
# ls -l bootstrap/
-rw-r--r--    1 2001     2001      7896835 Nov  7 10:36 bootstrap.ipk
-rwxr-xr-x    1 2001     2001         1423 Nov  7 10:36 bootstrap.sh
-rw-r--r--    1 2001     2001        74911 Nov  7 10:36 ipkg.ipk
-rwxr-xr-x    1 2001     2001        27658 Nov  7 10:36 ipkg.sh
-rw-r--r--    1 2001     2001       697377 Nov  7 10:36 openssl.ipk
-rw-r--r--    1 2001     2001       170521 Nov  7 10:36 wget-ssl.ipk
# cp bootstrap/ipkg.sh /opt/bin/
# chown root:root /opt/bin/ipkg.sh
3-4) 7-Zip解壓縮bootstrap.ipk, 取librt-2.3.3.so, FTP上傳
# mv /harddisk/hd~2/data/librt-2.3.3.so /opt/lib/
# cd /opt/lib/
# chown root:root librt-2.3.3.so
# chmod 644 librt-2.3.3.so
# ln -s librt-2.3.3.so librt.so.1
# cd ~
3-5) wget 測試. (ipkg需要wget)
# wget --help
GNU Wget 1.12, a non-interactive network retriever.
Usage: wget [OPTION]... [url]...
(省略)
3-6) 修改ipkg.sh, #104, #107
# vi /opt/bin/ipkg.sh
IPKG_DIR_PREFIX=opt/lib/ipkg
IPKG_TMP=$IPKG_ROOT/opt/tmp/ipkg
3-7) ipkg設定檔
# mkdir /opt/tmp
# mkdir /opt/etc
# vi /opt/etc/ipkg.conf
src nslu2 http://ipkg.nslu2-linux.org/feeds/optware/nslu2/cross/stable
src ds101 http://ipkg.nslu2-linux.org/feeds/optware/ds101/cross/stable
dest root /
3-8) ipkg.sh使用的相關檔案
# cd /bin
# ln -s busybox dirname
# ln -s busybox expr
# ln -s busybox find
# ln -s busybox gunzip
# ln -s busybox gzip
# ln -s busybox head
# ln -s busybox md5sum
# ln -s busybox rmdir
# ln -s busybox sed
# ln -s busybox sort
# ln -s busybox uniq
# ln -s busybox wc
# cd ~
3-9) 更新套件來源
# export IPKG_CONF_DIR=/opt/etc
# ipkg.sh update
3-10) 安裝ipkg-opt (for update-alternatives)
# ipkg.sh install ipkg-opt
Configuring ipkg-opt...Configuration file `/opt/etc/ipkg.conf'
 ==> File on system created by you or by a script.
 ==> File also in package provided by package maintainer.
   What would you like to do about it ?  Your options are:
    Y or I  : install the package maintainer's version
    N or O  : keep your currently-installed version
      D     : show the differences between the versions (if diff is installed)
 The default action is to keep your current version.
*** ipkg.conf (Y/I/N/O/D) [default=N] ?N
3-11) 取消ds101套件來源
# vi /opt/etc/ipkg.conf
src nslu2 http://ipkg.nslu2-linux.org/feeds/optware/nslu2/cross/stable
#src ds101 http://ipkg.nslu2-linux.org/feeds/optware/ds101/cross/stable
dest root /
3-12) 再安裝BusyBox (for busybox-links)
# ipkg.sh install busybox
如此一來, Optware busybox套件所支援的命令就可使用.
若要root使用Optware為優先, 更改PATH, 或建立.profile
# touch .profile
# vi .profile
export PATH=/opt/bin:/opt/sbin:$PATH
再來, 可使用nslu2或ds101(沒詳細測試過)套件來源, 安裝需要的套件(例如: PHP). ipkg-opt安裝套件有問題, 但可管理. 所以使用ipkg.sh安裝套件.
以上步驟很繁雜, 測試過程中, 必須依照錯誤訊息, 見招拆招. 若領悟後, 在其他NAS(或嵌入式設備)能telnet(或console)進入下, 就有機會安裝Optware, 也就能擴展原廠所沒有的功能, 達成自己的需求.
hugo15上傳的韌體, Library.
參考:
1. FNS-1000 to expand with the NSLU2 ipkg packages
2. FNS-1000 FNS-1000 - NFS and Telnet access
最後修改: hippo (2010-02-09 16:00:04)
離線
相關討論主題
| 主題 | 回覆 | 點閱 | 最後發表 |
|---|---|---|---|
|
1000元有找的NAS LevelOne GNS-1001 作者 dg4838
|
7 | 27453 | 2016-10-14 13:46:12 作者 mjrt |
|
[出售] LevelOne 200M 電力線 PLI-3021D 作者 dg4838
|
0 | 6356 | 2014-06-24 12:11:32 作者 dg4838 |


